
- Add baking soda or silica sand to paint to easily make the paint textured.
- Apply a base coat of paint and glaze; then, either ball up a rag and press it into the glaze or drag a comb through the glaze.
- Paint a base coat with a shaggy roller, or use a sponge to pat the paint and create a texture.
Using Baking Soda or Silica Sand

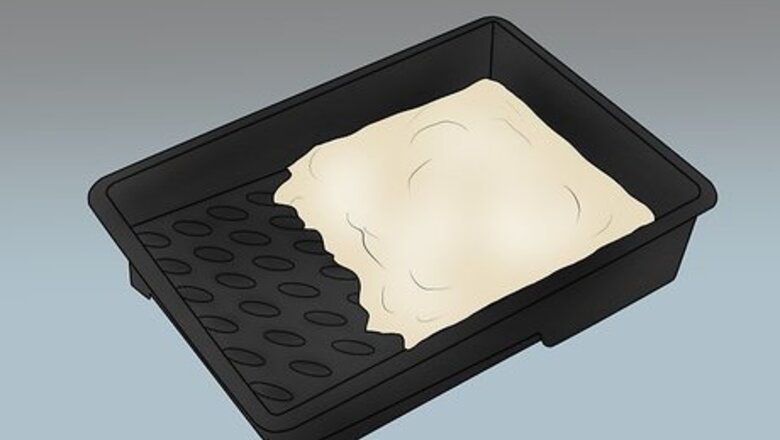
Fill a cup or paint tray with flat latex paint. Choose any color you like, as long as it’s flat and not glossy. Make note of how many cups (or mLs) of paint you pour, as you’ll need that number to know how much baking soda or silica sand to add. If you’re making textured paint for a painting or other craft, acrylic paint will also work. In addition to painting walls or canvases, use this technique to add texture to other things, like jars and vases. Get creative! Mixing paint can get messy, so cover your work surface with a plastic sheet, drop cloth, or old newspaper before you begin.
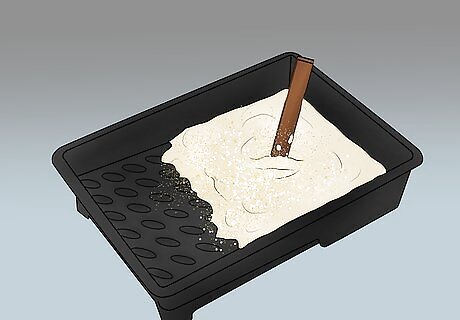
Mix baking soda or silica sand into the paint. If you’re using baking soda, add 1 tablespoon (17 g) for every 1 cup (240 mL) of paint. If you’re using silica sand, add 1 part sand to every 4 parts of paint. Use a wooden paint stick to thoroughly combine the paint and the texture. Baking soda reacts with paint to make the paint rise and fluff up, while the sand combines with the paint to create a grainy texture. When using silica sand, make sure to mix it so it’s thoroughly combined with the paint. If it isn’t, the sand will clump together and create an uneven texture. If you want a coarser texture, simply add more baking soda or silica sand to the paint.
Apply the paint with a brush or roller. If you’re painting a wall, make sure it’s clean and has a coat of primer beforehand to provide an even finish. Work with a wet edge, which means to only brush or roll sections that you can do while the paint is still wet. This creates a professional finish with minimal lap marks or shine differences. Stir the paint mixture between each application, as the baking soda or sand will settle at the bottom.
Apply a top coat of untextured paint. After your textured coat is completely dry, add another coat of plain, flat paint to create a more even finish and extend the life of your paint job. Use the same application technique you did for the first coat—a paint brush or a roller.
Using a Rag
Prep your walls and apply a base coat of paint. Lay down a dropcloth, a sheet of plastic, or old newspapers to protect your work surface. If necessary, patch up any dents or holes in your wall and clean it. Add a coat of primer, and once it dries, brush or roll on a coat of paint in the color of your preference. Note: your top coat needs to be 3 or 4 shades lighter or darker than your base coat, so choose a color accordingly. Allow your base coat to dry completely (at least overnight) before moving on to the next step.
Mix your second paint with glaze. Pour your second paint color into a paint tray, then add some glaze and mix them with a paint stick. If you want, add paint extender to the mixture, or some metallic paint to create a slightly metallic-looking topcoat. Glaze is a transparent or semi-transparent liquid medium that changes the appearance of the underlying paint. The exact ratio of glaze to paint depends on your individual project, but in general go with 3 or 4 parts glaze for every 1 part of paint.
Ball up a clean, damp rag and dip it into the paint. For best results, use a cotton cloth, though you can create different textures by using different fabrics. Dab the rag on a piece of paper or board to remove excess paint and see if you like the texture it creates. Use old cloths that you don’t care about getting ruined. You’ll likely have to throw them away at the end of the process.
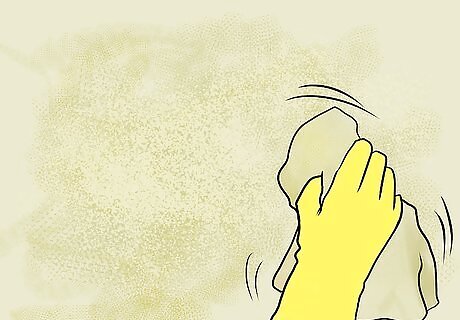
Pat the wall with the rag to create texture. Start in the upper righthand corner and move from right to left and top to bottom to cover the wall in paint. When the rag runs out of paint, simply dip it into the mixture again and reshape the ball if necessary. If it becomes too saturated, toss it and get a new rag.
Using a Comb

Apply your base coat to the wall. Cover your work surface by laying down a dropcloth, sheet of plastic, or old newspapers. If necessary, clean your walls and repair any dents or scratches. Add a layer of primer and wait for it to dry completely before rolling or brushing on your base coat of paint. For best results, use a quality latex eggshell enamel. Choose any color of paint you want, but keep in mind your top coat will need to be a few shades lighter or darker. For some colors, you may need 2 coats of paint. Wait for the base coat to dry completely before moving on to the next step.
Prepare the glaze. Choose a quality glaze enamel and dilute it. The exact ratio will depend on the heat and humidity in your area, but start with 1 part latex paint, 1 part glaze, and 1 part water. Adjust as needed to find the ratio that works for you. In general, a quart of latex paint thinned to this ratio should make enough glaze to cover a 10’ x 12’ room.
Apply the glaze with a paint roller. Glaze dries quickly, and it needs to be wet for you to comb through it. It’s helpful to have 2 people for this process—one to apply the glaze and one to do the combing. If you’re working alone, only apply as much glaze as you can comb before it dries. In general, roll on a coat about 18” to 24” (45.72 to 60.96 cm) wide from floor to ceiling at a time.
Run the teeth of a comb through the wet glaze. The comb’s teeth remove part of the wet glaze, allowing the base coat to show through. Start at the ceiling and work your way down, wiping the glaze off of the comb after each stroke. When you’re finished with a section, add more glaze to the wall and repeat until the whole wall is covered. It’s okay if your lines wobble here and there—the variety is what makes this technique fun and unique! If the glaze loses its wet edge before the next section is applied, blot it with a wet sponge or roll back over the dry area with glaze to wet it. Try making your own combing tool by cutting notches into the edge of a rubber or plastic squeegee. Experiment with the distance between the notches to create different patterns and textures.
Sponging the Wall
Cut a household sponge into an interesting shape. While you can use a regular sponge for this project, cutting it will make your paint job look even more unique. Before committing yourself to using a certain shape, test out different sponges by dipping them into some paint and pressing them to a sheet of paper. Experiment until you find the best shape for you. Or, purchase a sponge with an interesting texture from a craft or paint store. Using a natural sea sponge also works and helps to randomize the pattern, if that’s something you’re interested in.
Apply the base paint as you normally would. Before painting, cover your work area with a sheet of plastic, a drop cloth, or some old newspaper, and make any needed adjustments to your walls, like fixing dents or scratches or adding a coat of primer. Then, apply your selected paint with a paint brush or roller. For complete coverage, apply a second base coat after the first dries. Make sure your base coat is completely dry before moving on to the next step. In most cases, using flat or eggshell paint is best, but choose whatever type you prefer.
Mix your top coat paint with glaze. Choose a second color of paint and begin by mixing 1 part paint with 4 parts faux glaze in a bucket or paint tray. The more glaze you add, the more transparent your top coat will be, so if you want it to be darker, use less glaze. Experiment with different ratios until you find one you like. Depending on the style you’re going for, choose a base coat and glaze that are a similar intensity and tone to create a more even look. If there’s a lot of contrast, your walls may look too splotchy.
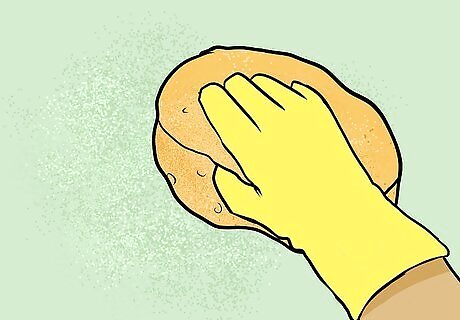
Dip the sponge into the paint and press it to the wall. Dampen your sponge and dip it into your top coat. Blot off any excess paint onto a spare sheet of paper or plastic, then start sponging the wall, beginning at the corner and working your way outward. Dip the sponge into the paint again when it runs out, and repeat the process until your wall is finished. Don’t press down too hard as you work or you might add too much glaze to the surface. Work in small areas at a time, as you want the edge of the painted area to stay wet.
Touch up areas with a small sponge. Once you’ve finished sponging your first layer, take a step back and see if there are any areas that look too bare. Use a small piece of a sponge to get into corners, correct any smudges, and create a consistent finish.
Add more paint colors (optional). If you want, try sponging on more colors of paint to add depth to the paint job. Repeat the process by mixing additional paint colors with glaze, then applying them to the wall with a fresh sponge. Be sure to use a different sponge for each color! Try using a few paints in a monochromatic scheme, then minimally applying an accent color.
Using Paint Rollers
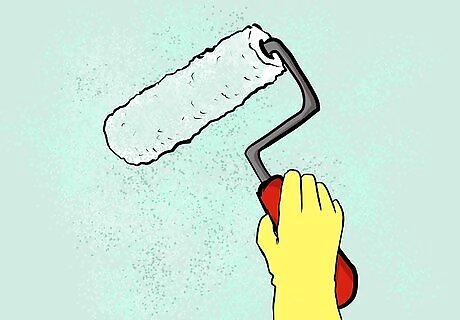
Use a shaggy roller to easily add texture. Shaggy paint rollers have longer fabric than normal paint rollers, so they naturally give paint a textured look. Choose a paint according to your preference and roll it onto the wall like you normally would. This is a great way to get some texture with minimal effort.
Roll on pre-mixed textured paint. If you don’t want to spend a lot of time creating your own textured paint or painting methods, consider applying a pre-textured paint instead. These paints can be found at most paint and home improvement stores, and many can be applied with a normal paint roller. Additionally, some come in cans that can be sprayed on the wall. Sand texture paint often comes pre-mixed and can easily be applied with a roller. It features a heavy-bodied finish that adds a gritty texture to walls and ceilings. Other texture styles include smooth, knockdown, orange peel, and popcorn. Some of these are available as sprays, while others need to be applied with joint compound and a putty knife.
Apply a joint compound before painting. Make your own textured paint by applying a joint compound to the wall before painting. Mix the compound according to its instructions, pour it into a paint tray, and apply it to your wall with a roller. When it’s partially dry, roll over the wall again to pull up the partially dried compound and create a 3D texture. When it’s completely dry, roll over it with the paint of your choice. Joint compound is a powder you mix with water to create a frosting-like paste. Dip a brush into the joint compound to add texture to the wall’s corners.


Comments
0 comment