views
Using T Budding
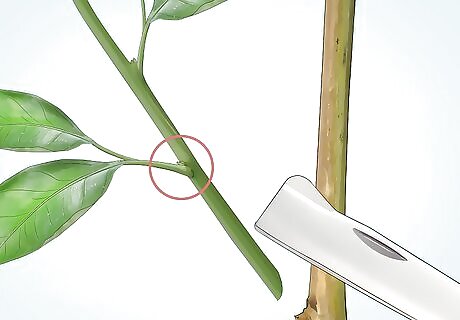
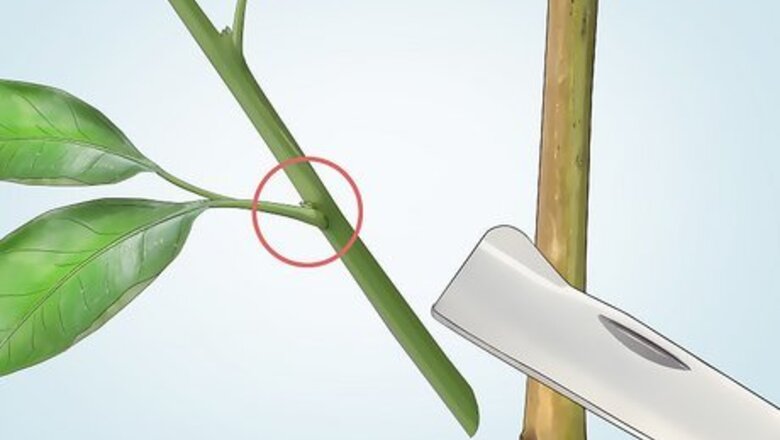
Cut a “budstick” from its source. Search for fully matured buds growing along the original plant (often called a “scion” in budding). Prioritize branches that are still actively growing well away from the plant’s stem, on the outside of the scion’s canopy. Look for buds that appear fat and healthy where leaf stems grow from the branch. Cut the branch from the scion and then snip away any leaves from the branch. This is now your “budstick.” When cutting away the leaves, make your cut at the base of the blades so that the stem is still attached to the branch. Matured buds of one species of plant may look considerably different from another. Search online for images and descriptions for the particular plant that you are budding. Make sure that your plant is capable of budding before you start. Some plants will only graft to particular species of plants while other plants may not graft at all.
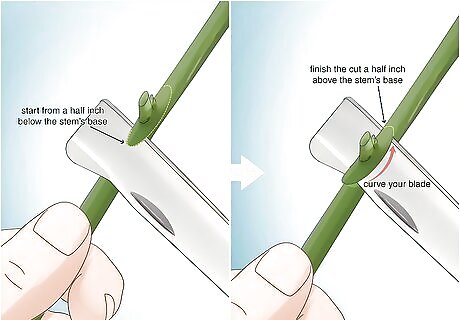
Carve a “bud shield” for grafting. Hold the bud stick so that the leaf stem is pointing away from you. Use a sharpened knife to begin your cut roughly a half-inch below the stem’s base. Slice into the bud stick toward the leaf stem. Curve your blade into the wood and then outward, in a crescent-moon motion, so that it comes out a half-inch above the stem. You should now have a small shaving of wood to graft into a new plant, the bud itself, and the leaf stem to use as a handle, all in one piece (this piece is called a “bud shield”). To make sure the bud doesn’t go flying, remove the blade from the budstick just before it breaks the surface on its way out. From the outside, slice a cut a half-inch above the stem, as though crossing a “T” along the top of your original cut. You also can do I-budding, where you cut a capital "I," with one horizontal cut at each end of the vertical cut. These cuts should be as smooth as possible. Rough sawing actions with your knife will prevent the wood from successfully grafting with the new plant.
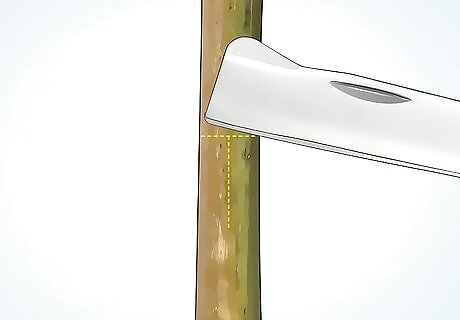
Make a T-cut in the new plant. Choose a smooth spot on the stem of the new plant (called a “root stock”) to graft your bud to. Make the vertical cut first, from top to bottom, along the stem. Keep it to the same size as the length of your bud shield. Then make a horizontal cut along the top to form your “T.” Alternately, you can make your horizontal cut along the bottom of the vertical cut. This will allow excess water or sap to drain from the root stock more efficiently.
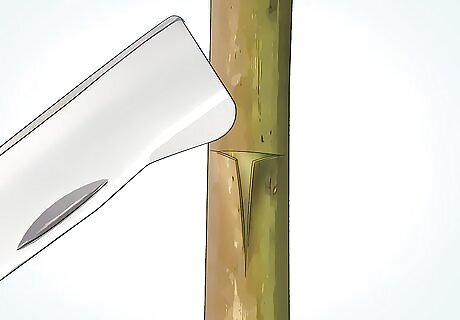
Create a pocket. Peel the bark away from your T-cut. Start from the inside corners where the vertical and horizontal cuts meet. Peel outward until a triangle of the plant’s tissue is exposed. Stop here, without tearing the peeled bark off the stem. If the bark resists peeling, this may be a sign that the root stock has not fully recovered from its winter dormancy. Wait until its dormant cycle is completely over before grafting. Usually this is during the height of summer.
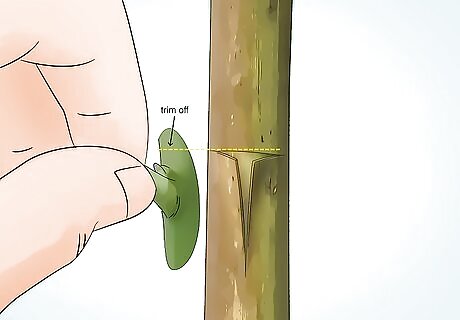
Trim the bud shield if needed. Hold the bud shield by its leaf stem. Line it up with the vertical cut in the root stock. Place the bud shield’s wood shaving against the root stock’s exposed tissue. If the top of the wood shaving is higher than the root stock’s horizontal cut, cut off the extra wood so that it doesn’t stick out.
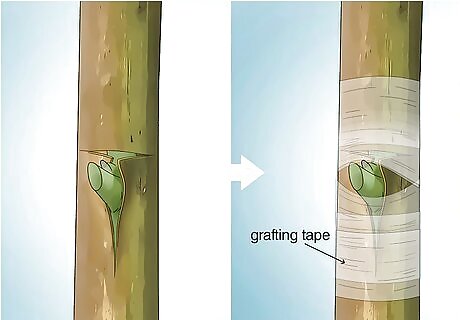
Graft the bud shield to the root stock. Once the bud shield lines up perfectly with the root stock’s vertical cut, line the two up. Smooth the two flaps of peeled bark over the bud shield to cover it. Wind grafting tape around and around the root stock to seal the graft, leaving only the bud shield’s leaf stem and bud exposed. Let the plant heal for two to three weeks, then remove the grafting tape. Trim the root stock above the bud shield to motivate growth from the scion bud If it is too late in the season to expect growth immediately, wait until winter to trim the top of the root stock. Budding rubbers, which break down naturally, can be used instead of grafting tape.
Trying Chip Budding
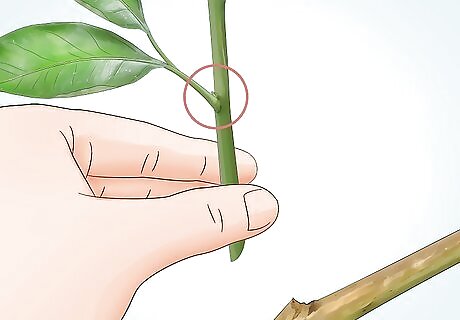
Remove a budstick from the scion plant. Search for fully matured buds on branches that are still actively growing on the outside of the original plant’s canopy. Look for buds that appear fat and healthy in the crooks where leaf stems grow from the branches. Cut the branch from the original plant (or "scion") and then snip the leaf blades from their stem. The cut branch is now your "budstick." Do not cut the leaf stem from the branch. This way you will be able to hold your eventual "chip" without disturbing the bud itself. Matured buds of one species of plant may look considerably different from another. Search online for images and descriptions for the particular plant that you are budding.
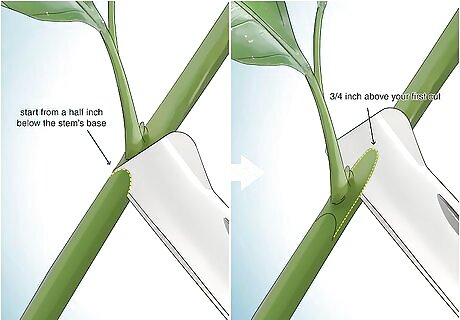
Make your cuts. Position your blade horizontally along the budstick, about a half-inch below the bud and leaf stem. Slice downward into the budstick at an angle of roughly 50 degrees. Make your cut an eighth of an inch deep. Perform your second cut by placing your knife about three-quarters of an inch above your first cut, with the bud and leaf stem between the two. Position it horizontally along the branch. Slice downward into the wood, angling the blade so that it connects with your first cut. Once the cut is made, pluck the chip out of the scion by its leaf stem. You may need to vary the depth and length between the two cuts according to the size of your plant and its buds.
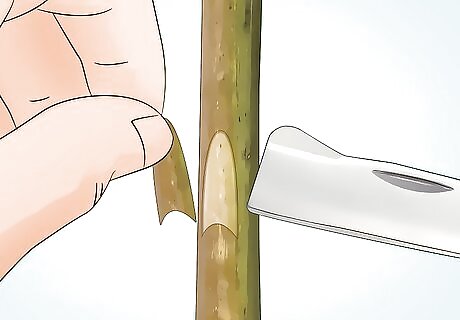
Carve a pocket in the root stock. Choose a smooth area on the stem of the plant receiving the transplant (called a "root stock"). Perform the same cutting technique here to create a pocket to receive your chip. Try to make it as identical as possible in size and shape to your chip so that one fits into the other perfectly. Because you do not need to peel live bark to make your pocket, this technique can be used before and after summer, unlike T-budding.
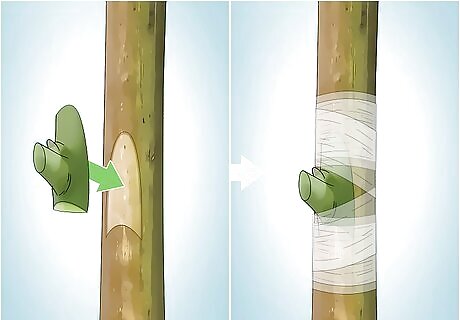
Graft your chip. Insert the chip into the root stock’s pocket. Wind grafting tape around the graft. Cover the bud and stem as well as the whole graft. Seal it tightly to prevent loss of moisture, which is a greater risk with chip budding than it is with T-budding. Let the plant heal for two to three weeks, then remove the grafting tape. Trim the root stock above the chip to motivate growth from the scion bud. If the chip is smaller than the pocket, line up as many sides of the chips as possible with the corresponding edges of the pocket. If it is too late in the season to expect growth immediately, wait until winter to trim the top of the root stock.
Using Patch Budding
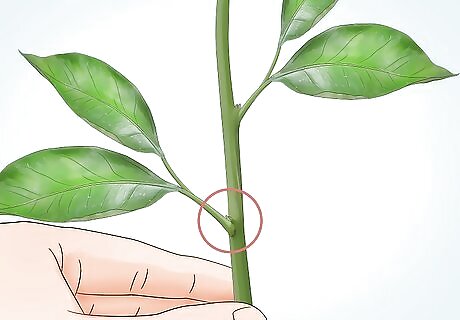
Cut a budstick from a scion plant. Look along branches that are actively growing on the outside of the original plant’s canopy. Search for fully matured buds where the leaf stems meet the branches. Cut the branch from the original plant (called a "scion"). Then cut the leaves from the very top of their stems. What you have left is a "budstick." Snipping the leaf's blades away and leaving the stem creates a handle to hold your eventual “patch.” Matured buds of one species of plant may look considerably different from another. Search online for images and descriptions for the particular plant that you are budding.
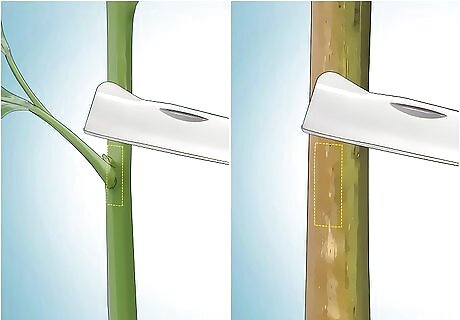
Cut out your patches. First, make a horizontal slice along the budstick, about a half-inch above the bud and leaf stem. Then make a second, parallel slice of equal length about a half-inch below the bud. Perform a third, vertical slice from the end of one horizontal cut to the corresponding end of the other. Then make a second vertical slice to connect the other two ends of the horizontal lines. Now carefully peel the rectangle of bark from the branch. Next, find a smooth stretch along the stem of the "root stock" (the plant that will receive the scion patch). Use the same cutting technique to remove a rectangular patch of equal size. You can also try the I-budding method, which is very similar. You make the same types of cuts, but the first cut is vertical instead of horizontal. Cut one vertical line and two horizontal lines (one at each end of the vertical line). The finished cut will look like a capital “I.”
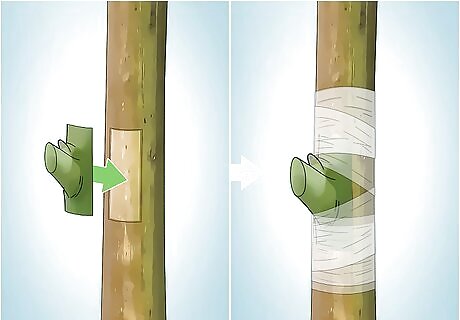
Graft and wrap your patch. Place the scion patch into the root stock’s open patch. Line the sides of each one up so they are flush. Wind grafting tape around the patch to seal it, leaving the bud and leaf stem exposed, or use budding rubber to secure the patches. Let the plant heal for two to three weeks. If you used grafting tape, remove it, since it doesn’t break down naturally like budding rubbers do. Trim the root stock above the patch to motivate growth from the scion bud. If it is too late in the season to expect growth immediately, wait until winter to trim the top of the root stock.





Comments
0 comment