

Using CMD
Click the Start button Windows Start. It's the button with the Windows icon in the lower-left corner.

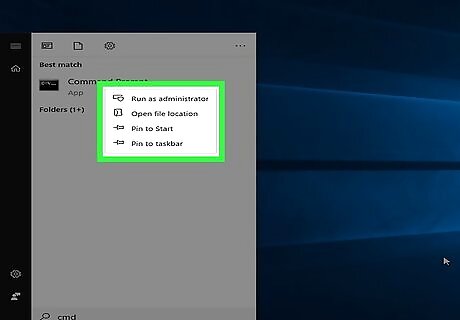
Type cmd. This searches for the command prompt and displays it at the top of the Windows Start menu.

Right-click Command Prompt. It has an icon that resembles a black screen with a white prompt. Right-clicking this icon displays a menu to the right of the Command Prompt icon.

Click Run as administrator. This opens the Command Prompt with administrative privileges. You must be signed into Windows using an administrative account in order to run the Command Prompt as an administrator.

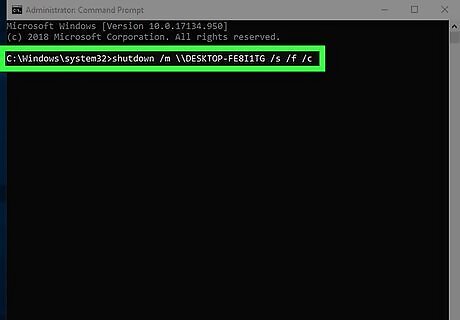
Type shutdown in the Command Prompt. This is the first line to shut down a computer. To see a complete list of shutdown commands, type shutdown /? in the Command Prompt.
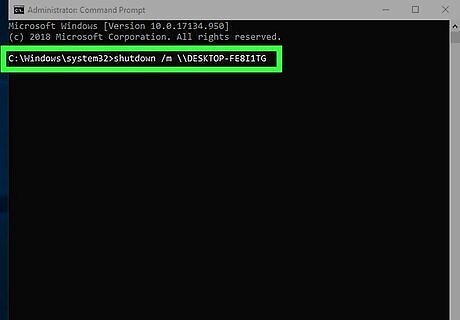
Type m \\computername. Type this one space after "shutdown" on the same line. Replace "computername" with the actual name of the target computer.
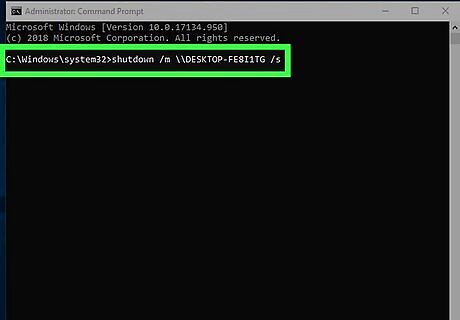
Type /s or /r one space after the computer name. If you want to shut down the target computer type "/s" one space after the computer name. To restart the computer, type "/r" one space after the computer name.
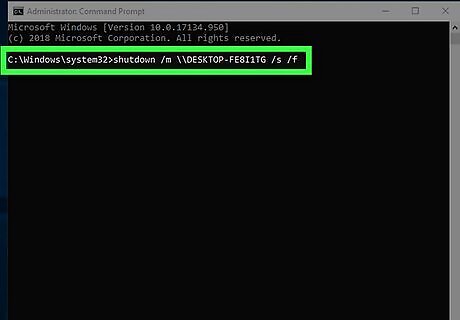
Type /f. Type this one space after "/s" or "/r". This forces all programs to close on the remote computer. Note: The user may lose unsaved work if programs are forced to close without saving. Continue to the next step to learn how to alert the user and give them a few seconds to save their work before the computer or shuts down or restarts. The entire command so far should look something similar to this: shutdown \\workspace1 /r /f. Press ↵ Enter to restart the computer immediately. Continue to the next step to add a timer with a comment.
Type /c. This goes one space after "/f" on the same line. This allows to you send a message to the target computer.
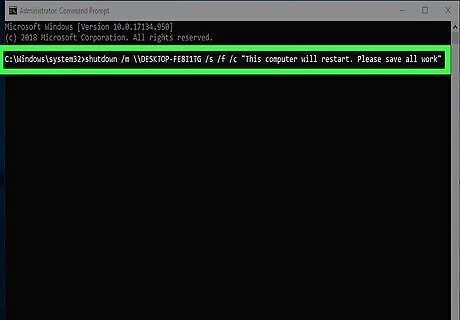
Type a message in quotation marks. This goes one space after "/c". The message should alert the user of the remote computer that the computer will shutdown. For example, you could type "This computer will restart. Please save all work". Make sure the message is in quotation marks (" ") .
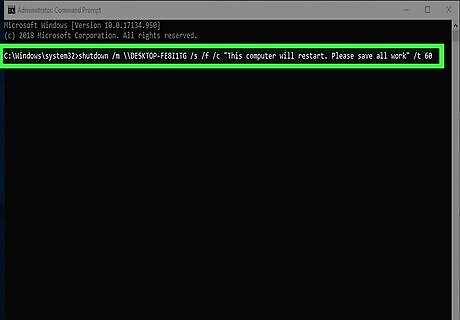
Type /t followed by the number of seconds. This goes one space after the message in the previous step. This is how you can give the user a few seconds to save their work before the computer shuts down. For example, /t 60 would give the user sixty seconds to save their work before their computer shuts down or restarts.
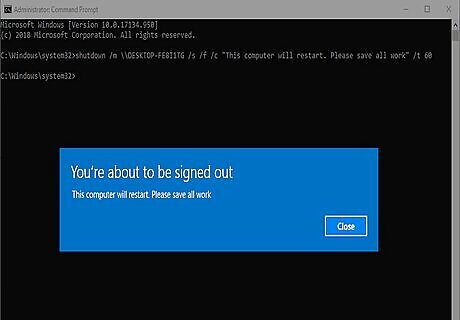
Press ↵ Enter. This executes the command. The entire command should look something similar to this: shutdown m\\workspace1 /r /f /c "This computer will restart in 60 seconds. Please save all work." /t 60. If you receive a message that says Access Denied, make sure you are signed in to an administrative account and that you have administrative access to the target computer. See Method 3 to learn how to enable File and Printer Sharing on both computers and allow it through the Windows Firewall. If you are unable to connect to the registry on the target computer, see Method 4 to learn how to edit the registry on the target computer. EXPERT TIP Luigi Oppido Luigi Oppido Computer & Tech Specialist Luigi Oppido is the Owner and Operator of Pleasure Point Computers in Santa Cruz, California. Luigi has over 25 years of experience in general computer repair, data recovery, virus removal, and upgrades. He is also the host of the Computer Man Show! broadcasted on KSQD covering central California for over two years. Luigi Oppido Luigi Oppido Computer & Tech Specialist Expert Warning: If you're shutting down a computer from the command prompt, the computer will probably close all of its processes before it shuts down. However, if you run a shutdown command from a PowerShell, it could supersede any other safeties and shut everything down immediately, which could cause you to lose data.
Using Remote Shutdown Dialog

Click the Start button Windows Start. It's the button with the Windows icon in the lower-left corner.

Type cmd. This searches for the command prompt and displays it at the top of the Windows Start menu.
Right-click Command Prompt. It has an icon that resembles a black screen with a white prompt. Right-clicking this icon displays a menu to the right of the Command Prompt icon.

Click Run as administrator. This opens the Command Prompt with administrative privileges. You must be signed into Windows using an administrative account in order to run the Command Prompt as an administrator.
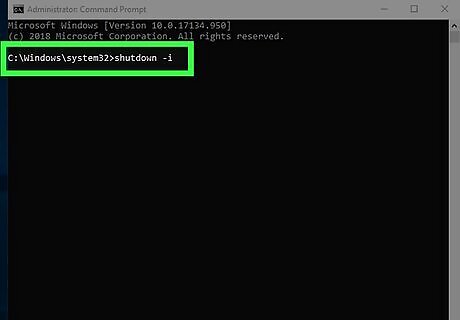
Type shutdown -i and press ↵ Enter. This opens the Remote Shutdown Dialog window.
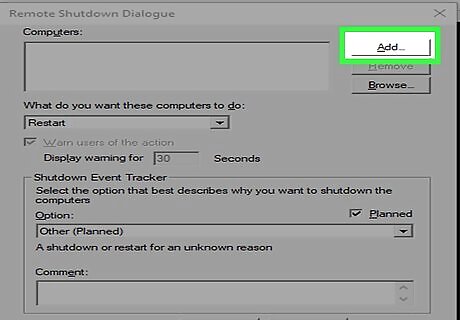
Click Add. It's to the right of the "Computers" box.
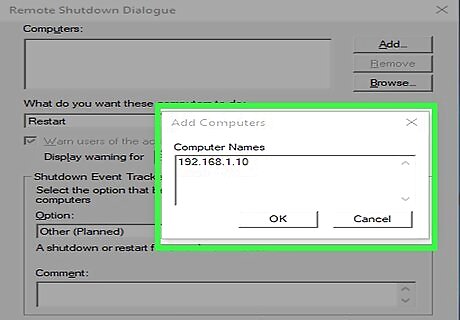
Type the IP address of the target computer(s) and click Ok. The target computer is the computer you want to shut down or restart. Type the IP address of that computer in the "Add Computers" window, and click Ok. If you are not sure what the Private IP address is for the target computer, you can find it using that computer.
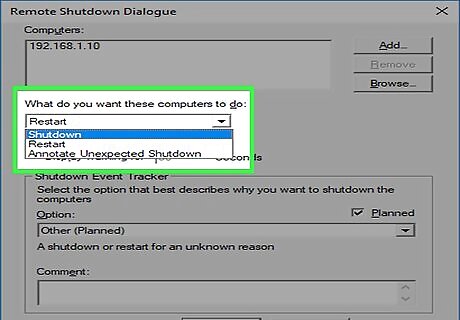
Choose if you want to shut down or restart a computer. Use the drop-down menu below "What do you want these computers to do" to select "Shutdown" or "Restart".

Click the checkbox Windows regchecked next to "Warn users of action" (Optional). This allows you to set a timer for when the computer(s) will shutdown.
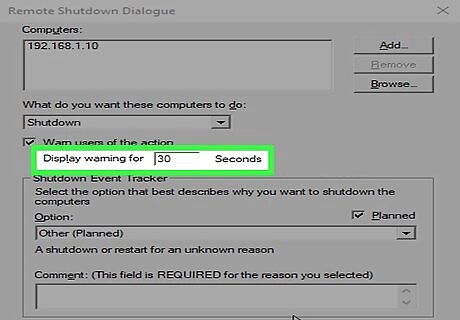
Type the number of seconds until the computer(s) shutdown (Optional). Type a number in the box in the sentence "Display warning for [ ] seconds". This sets a timer for when the computer(s) shutdown.
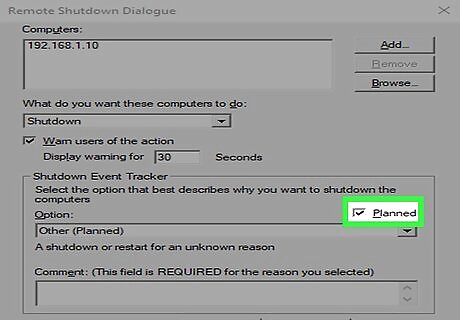
Click the checkbox Windows regchecked next to "Planned" (Optional). This allows you to create an event tracker for the remote shutdown or restart.
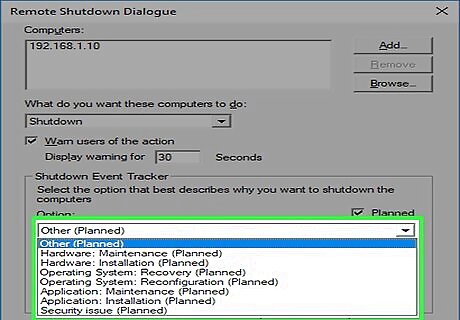
Select a reason for the shutdown (Optional). Use the drop-down menu below "Options" to select the best reason for the shutdown/restart. For example, "Hardware: Maintenance (Planned)".

Type a comment (Optional). This will be displayed on the target computer. For example, "This computer will shut down in 60 seconds. Please save all work."
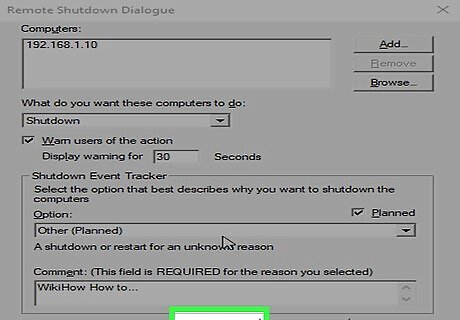
Click Ok. This executes the Shutdown or Restart. If you receive a message that says Access Denied, make sure you are signed in to an administrative account and that you have administrative access to the target computer. See Method 3 to learn how to enable File and Printer Sharing on both computers and allow it through the Windows Firewall. If you are unable to connect to the registry on the target computer, see Method 4 to learn how to edit the registry on the target computer.
Enabling Printer and File Sharing

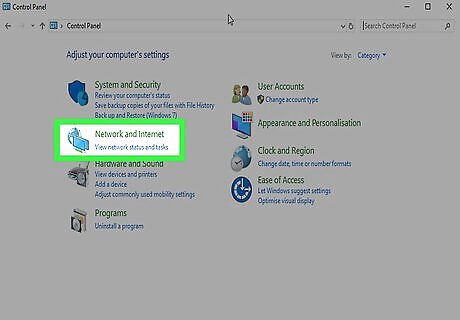
Open the Control Panel. Use the following steps to open the Control Panel. Click the Windows Start menu. Type Control Panel. Click the Control Panel.

Click Network and Internet. It's the green text next to an icon that resembles two computer screens in front of a globe. Skip to the next step if you don't see this option.
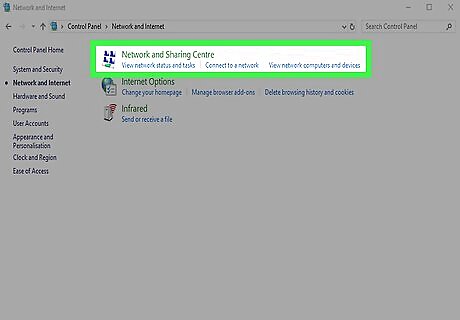
Click Network and Sharing Center. It's next to an icon that resembles four connected computers
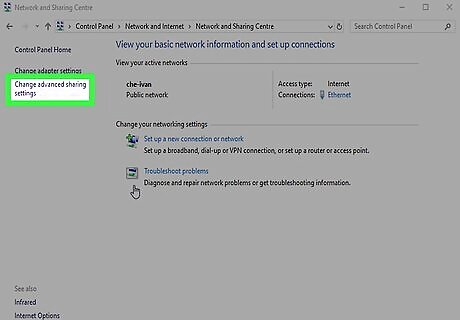
Click Change advanced sharing settings. It's at the bottom of the sidebar to the left.
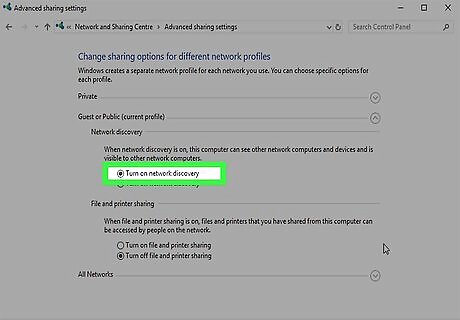
Click the circular button next to Turn on network discovery. This enables network discovery.
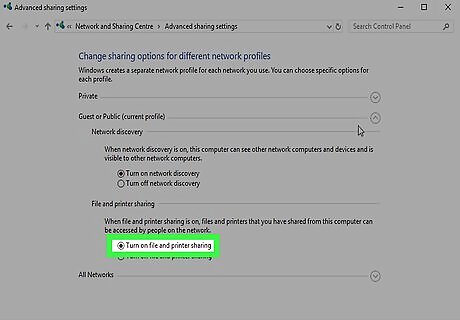
Click the radial button next to Turn on file and printer sharing. This enables file and printer sharing.
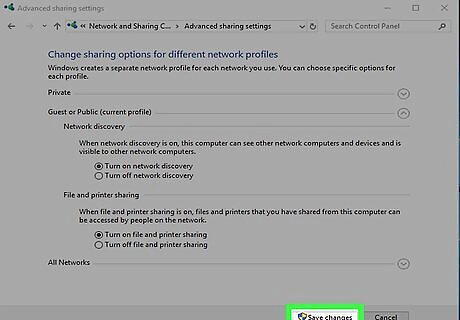
Click Save Changes. It's in the lower-right corner.
Click Network and Internet. It's in the address bar at the top of the Control Panel. This returns to the Network and Internet menu of the Control Panel.
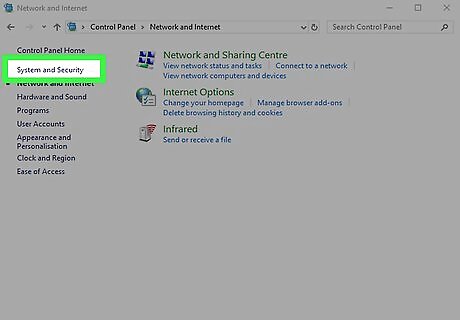
Click System and Security. It's in the sidebar menu to the left.
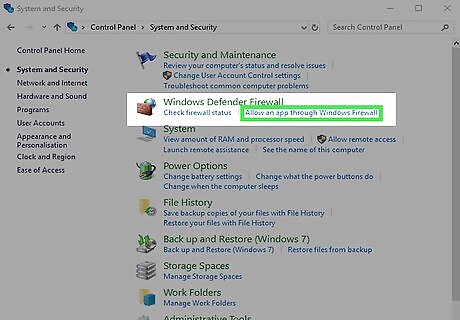
Click Allow an app through Windows Firewall. It's the second option below "Windows Defender Firewall".

Click the checkbox Windows regchecked next to "File and Printer Sharing". It's in the list of allowed apps and features.
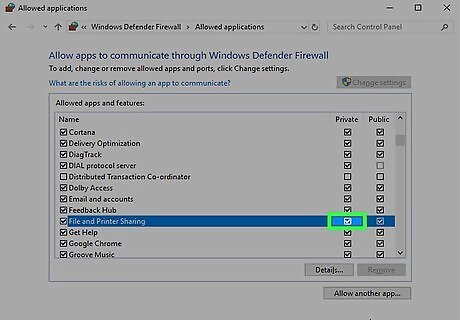
Click the checkbox Windows regchecked below "Private". It's to the right of "File and Printer Sharing" in the list of allowed apps and features.
Click Ok. It's at the bottom of the Control Panel window. This saves and applies the changes you have made.
Editing the Registry

Click the Start button Windows Start. It's the button with the Windows icon in the lower-left corner. On newer versions of Windows, administrative privileges are often stripped when trying to access a computer remotely. You can fix this by editing the registry.
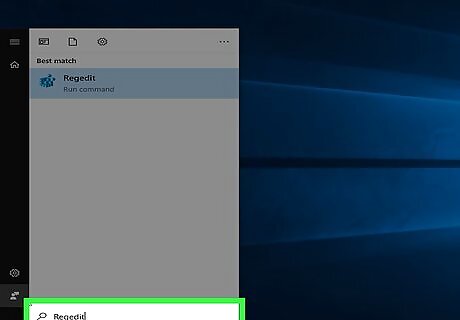
Type regedit. This displays the regedit (Registry Editor) app. Warning: Editing or deleting items in the Registry Editor can cause permanent damage to your operating system. Proceed at your own risk!
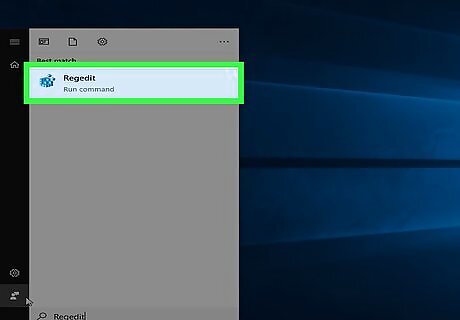
Click Regedit. This opens the Registry Editor app.
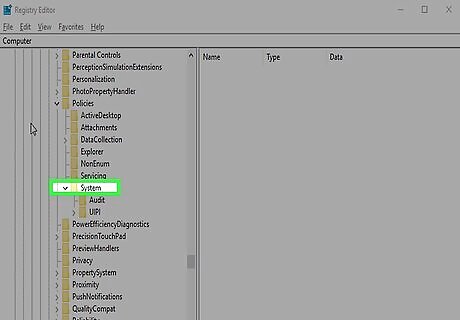
Navigate to the "System" folder in "Policies". You can use the folders in the sidebar to the left to navigate in the Registry editor. Use the following steps to navigate to the "System" folder in "Policies": Double-click the HKEY_LOCAL_MACHINE folder. Double-click the SOFTWARE folder. Double-click the Microsoft folder. Double-click the Windows folder. Double-click the CurrentVersion folder. Double-click the Policies folder. Double-click the System folder.
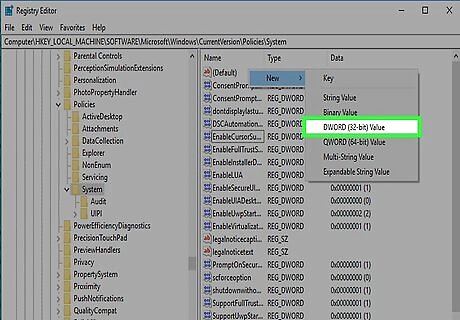
Create a new DWORD value. Use the following steps to create a new DWORD value in the "System" folder. Right-click a black spot in the window to the right of the folders in the sidebar. Hover over New. Click DWORD (32-bit) Value.
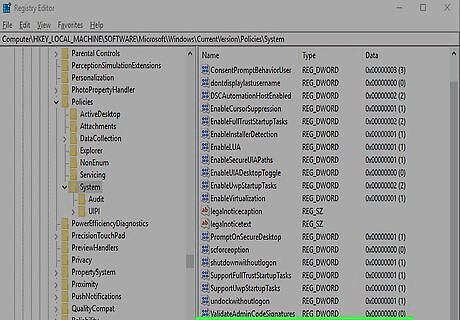
Name the new DWORD value "LocalAccountTokenFilterPolicy". When you create a new DWORD value, the name will be highlighted blue. Immediately type "LocalAccountTokenFilterPolicy" to rename the value.
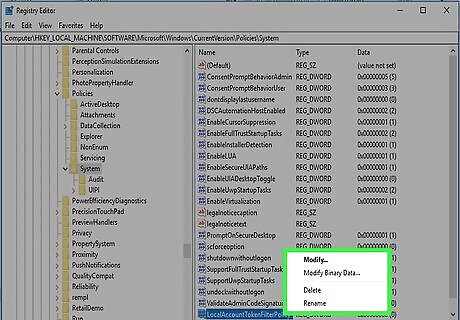
Right-click LocalAccountTokenFilterPolicy. This displays a menu to the right of the value.
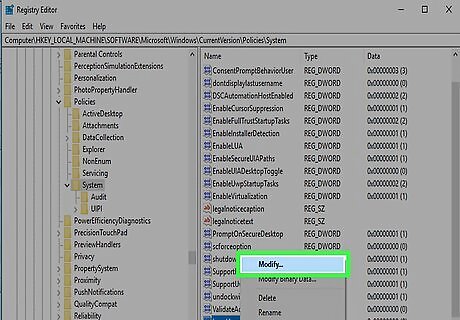
Click Modify. This opens an editor window for the DWORD value.
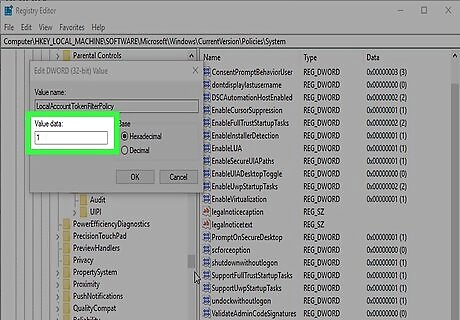
Change the value data to "1". Use the box below "value data" to change the value from "0" to "1".
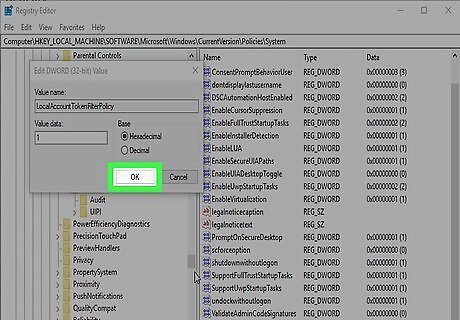
Click Ok. This saves the DWORD value. You can now close the registry editor.


Comments
0 comment